

I believe the reason they say
15-20% is because there are so many factors affecting shrinkage: size,
thickness, firing conditions, kiln, etc.
I think if you want precisely
sized rings, the best course is the one Hattie Sanderson is taking. She is using her Hattie’s Patties (fire in
place ring inserts) to enforce size and also making stainless steel mesh
‘cages’ to fire the rings in so that the carbon doesn’t get between the ring
and the insert causing distortion.
Interestingly, a ring in a stainless steel cage is actually surrounded by air (in the
cage) and then the cage is surrounded by 8-10mm of carbon. You can read about Hattie’s method HERE.
Rings made in PMC Sterling
can be up-sized on a mandrel, as well.
 |
| diamond ring |
Sand paper is messier than whittling, so if I can whittle, I will. But as it's turned out, the whittling has taken me in a new design direction, a direction about which I am excited.

These are a group of washer rings (no seam) cut with a long blade and a template that let me avoid the business of making a seam. The one on the top left is the start of the Diamond ring. Once they are dry, I make a record of them with my copier.

Then I annotate the ring images, both so I can remake a specific ring and to reinforce the shrinkage.

These washer rings shrink less than the band rings. Washer rings shrink approximately 1-2 sizes. I don't know why, but I remember noting a similar phenomenon when I was testing BronzClay.
In the upper right corner is the Diamond Ring, whittled down with a scalpel, ready for setting the diamond.
The lower left is the start of the carved washer ring.

Blisters and Firing Modifications
I have had one piece of PMC Sterling blister in the past year. Since then (3 months ago) I have slowed the ramp down in the atmosphere stage; I've done 6 firings at 500F per hour and now 6 more at 800F per hour to 1000F (hold for 30 min). This is based on the theory that I may not have been burning the binder out sufficiently at the full ramp and that slowing the ramp down when air-firing may do so.
After cooling, I transfer the pieces to a steel container and put them on 10mm of carbon, then I add more carbon until it is 10mm above the top of the piece. I cover the steel container, put it into the kiln, on kiln feet so air can circulate, then fire full ramp to 1520F** and hold for 1 hour (or more if the piece is large or there is more than one piece).
I was able to sand and burnish the blisters away on the ring shank even though it was very badly blistered. The blisters were not empty inside; they were more like bulges so they could be pressed/abraded down. It's strong and fully sintered and looks fine.
**KIlns vary! It's important to know your kiln and how accurate the temperature is. Check the temperature, and do a few test pieces before you invest lots of time in a piece.

Shrinkage: This is an openwork ring, dry and ready to fire. It's size 11.5. When fresh, this ring was 12.5. Freshly fired the ring is size 9.5.

I have made many of these rings and have gotten this same shrinkage each time: 3 sizes from fresh to fired, 2 sizes from dry to fired.
It's important to note that because of the construction techniques I use, the dry to fired shrinkage (2 sizes) is the more accurate number.
These 2 open work rings have 24k gold keum-boo on the inside.


A bit more on shrinkage:
Flat pieces made of PMC Sterling are shrinking 15% consistently. This stitched ring was fired as a flat strip, then bent around a mandrel and stitched.

This picture describes how I checked the shrinkage. The graph paper shape is the template I used to cut the ring out so it's the size of the ring in fresh clay (and 4 cards thick). The similar shape with the purple lines running across it is the fired piece enlarged by 118% (enlarging by 118% is equal to 15% shrinkage). These two shapes being the same size proves a shrinkage rate of 15%.
[Here's why: 15% from 100% equals 85%, to find the size you need to end up at 100, you divide 100 by 85 and get 118%.]


These small disks were made by my apprentice, Erin M. Harris. They were rolled at two cards. She made a copy of the circles dry, ready to fire (the group on the right). The disks on the left are fired and enlarged by 118%. The two groups are equal in size proving that these small disks also shrank 15%.
The official shrinkage rate is 15-20% and as I've said, there has been some variation in my results. However, the shrinkage seems to be consistent by type: Washer rings are consistent with other washer rings, but vary from band rings, which are consistent among themselves.
Hattie Sanderson and Janet Alexander have both done a great deal of research on PMC Sterling in the past year. Janet keeps a blog HERE.
In this series of rings I am investigating shrinkage. I am also using a group of techniques that work with, rather than against, the natural tendency of metal clay to dry out; developing a natural edge, tearing, chipping and just turning the other cheek while it dries.
2 Tips for working with carbon:

Pouring the carbon from 1 container to another, in front of a window fan (blowing out), will keep your carbon dust free. I do this after every 2nd or 3rd firing.

6" plastic ruler is a great way to keep track of how much carbon you've poured: Pour 10mm of carbon as a base, place your piece on that and continue pouring the carbon until it's 10mm above your piece.
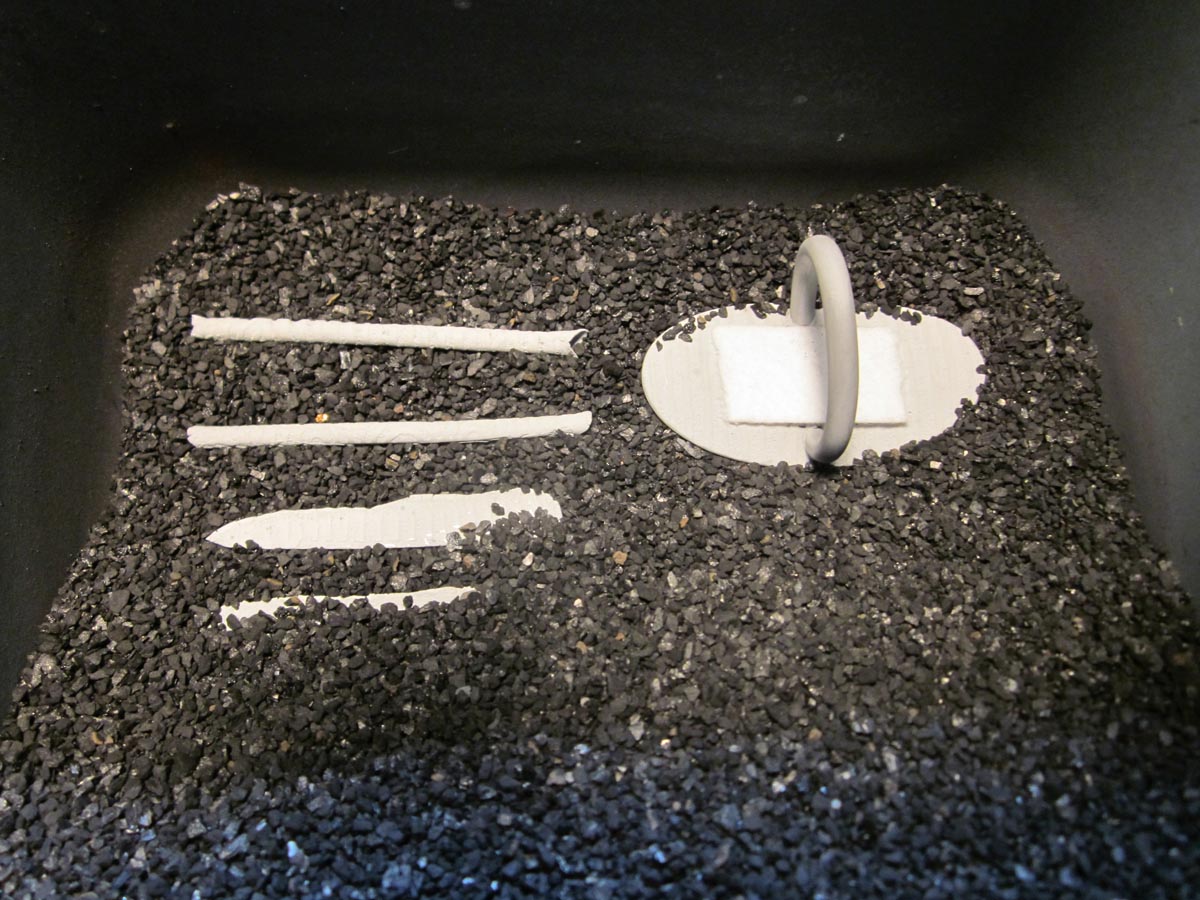
I have used
kiln paper to protect delicate openwork designs from carbon so that carbon granules don't wedge into open work and distort it.

Wow! Celie, thanks for all the work you did to share this information!
ReplyDeleteKelley O.
Thank you for sharing your very detailed findings!
ReplyDeleteCelie, this is great! Thanks for sharing your insights with us. Hope you do more on line classes, and of course someday I hope to take a class in person!
ReplyDeleteThanks for this great information! I'm looking forward to your pre-conference class in June!
ReplyDeleteThanks for the comments!
ReplyDeleteAwesome post- very thought provoking and inspiring. I thoroughly enjoyed your Craftcast class and this expands many of the things you said there. I hope to some day be able to do a class in person!
ReplyDeleteGreat post, Thank you!
ReplyDeleteThanks, Envydesign, and PPennee for your comments. PPennee, I'm so pleased you enjoyed the CraftCast. I hope to meet you, too.
ReplyDeleteHi. Celie, I have just finished making a few rings using SSC, and each one shrunk 9 sizes, I know the shrinkage should be only 2 or 3 sizes.
ReplyDeleteI cannot understand why this has happened, and wondered if you had any suggestions.
Thanks for all your information about SSC. on your blog.
Ann
Dear Ann,
ReplyDeleteWow, that's bizarre. I am happy to try and troubleshoot the problem with you but you're going to have to give me very detailed information: What size they started at and shrunk to, what kind of carbon, your firing schedule, how many times this happened, how many times you've fired and anything else you can think of. I've never had (or heard of) this much shrinkage.
Perhaps better to do this in an email from my web site then I can write more. If it turns out to be of more general interest I can post a summary here.
Best, Celie
Wow! Lots of good info here. Thanks for sharing. and LOVE your artwork.
ReplyDeleteI have just begun experimenting with PMC Sterling for fingerprint jewellery. I'm really glad I found your blog because I haven't had the greatest success :-(
ReplyDeleteThe first lot I fired came out very blistered so I lowered the temperature of the kiln from 815C to 795C and the blistering was better, but I got a bulge! I fired another few test pieces. I did a full ramp to 538C to burn the binder off and after reading your blog I am going to try a slower ramp for the next test piece. For the 2nd firing I put the pieces into a little steel mesh box and buried that in the carbon. I used Ramp 4 (sorry I don't understand all the technical aspects of temperature per hour!) to 795C and held for 30 mins. These test pieces came out with huge bulges on both sides of the pieces! I have been able to knock them down, but it obviously affects the fingerprint! Would the mesh box affect the firing? I didn't use the mesh box for the pieces that blistered really badly. When you torch fire the binder how long do you fire it for?
Hi Mum,
ReplyDeleteThe following is a FB post I just made in reply to a blistering problem. I thought it might be helpful. I would not recommend torch firing for PMC STerling!
Regarding blisters:
I got blisters once, almost a year ago, and since then have not had any problems and PMC Sterling is all I use. The only thing I changed is the ramp rate in the air (binder burn out) phase: I slowed it down to 800F per hour to 1000F, hold for 45 minutes.
The theory is that the blisters are forming because the clay is developing a "skin" before all of the binder is gone from the clay. This happens in the air fire stage when you full ramp the kiln. This "skin" prevents gases from exiting the clay so blisters/bubbles form. Although they do seem to occur in the air fire stage they do not show until after the carbon fire.
You mentioned that you are using a hot plate: It may be starting this process by being too hot. Have you tried air-drying, or perhaps a dehydrator?
Two other things you might try in addition to slowing the ramp: Lowering the set temp in the air fire from 1000F to 900F and slow the ramp down a little in the carbon fire stage. But first just try slowing down the air fire ramp.
For what it's worth, the blisters seem to be voids. That means that if the design allows for it, they hammer or mallet out very nicely.
As I said I'm just working in PMC Sterling and I love it!
Celie
Enhancing my information i found it very helpful...
ReplyDeleteHello Celie,
ReplyDeleteI too had my band ring shrink almost 5 sizes (if I'm correct), from UK size Z 1/2 to P 1/2. I expected it to shrink to T and then up-size it to T 1/2. Have I done something wrong?
I used the schedule in your pmc sterling ring craftcast exactly but in a no-flake box.
Many thanks for your time.
Dear Anthonia,
ReplyDeleteI think this may be a matter of some confusion about the UK system vs the US system of ring sizing; that's what it was in the earlier comment. This is an excerpt from my exchange with Ann, from the UK, who thought her PMC Sterling rings were shrinking 8 sizes.
I sent her the this link to a chart comparing the US system that I use to the UK system that she uses. :http://reviews.ebay.co.uk/RING-SIZE-CONVERSION-CHART?
When I realized that the discrepancy lay in the difference in the two ring sizing systems, I wrote this to Ann:
You say that you made a size V and it shrank to an O. V is equivalent to size 10.5, O is equivalent to size 7. There may be 10 sizes between V and O but there are only 3.5 sizes between size 7 and size 10 1/2. We don't count half sizes and if I understand correctly, you're saying you do. I think that's where the discrepancy lies.
Let me know if you think this might explain your shrinkage issue.
Best,
Celie
Dear Celie,
ReplyDeleteThank you very much for taking time to answer my question. I am quite new to metal clay and this ring is my first. I don't know how we count ring sizes in the UK, however I reckoned (using the chart on metalclays.com) that my size Z 1/2 is the equivalent of US size 12 3/4 which should shrink 3 sizes to 9 3/4. Was there where I got it wrong?
I don't quite get it, and I'm sorry for the bother.
Dear Anthonia, It's no bother, really. I'm just having some trouble understanding your numbers. If you can explain it to me in terms of the US ring system I may be able to give you better advise. I'm asking you to tell me what size your ring was when it went into the kiln, and what size it was when it cam out: US sizes, though.
ReplyDeleteAlso, it's worth remembering that all you need is consistency so if your rings are shrinking 3 sizes or 12 sizes, if they are consistently doing so, then you have a "system" you can go by.
I hope that's not confusing.
Best,
Celie
Dear Celie,
ReplyDeleteThanks a lot, I understand the consistency point you made.
My ring in the dry stage before firing was US size 12 3/4 and it shrank to US size 8.
i interest
ReplyDeleteNice blog! Sterling silver pieces are difficult to find now, adding a sense of rarity that is hard to capture today. This blog have lots of valuable stuff. You can also check sterling silver cuff bracelet collections here.
ReplyDeleteHi Dear,
ReplyDeletei Like Your Blog Very Much..I see Daily Your Blog ,is A Very Useful For me.
If you are looking for cheap Sterling silver rings then you are the right place our prices starting US$3.99 a huge selection of Jewelry choices.
Visit Now - https://prjewel.com/
Really a very nice post, thanks for sharing.
ReplyDeleteSolid Gold Charms
Vintage 14k Charms
14k Gold Charms
A very informative and well-structured article. The content is clear, engaging, and full of useful insights. Great work on making the topic easy to understand and valuable for readers.
ReplyDeleteEnrgtech
Scalpel Blade